This document provides connection instructions for SQL 7.0 users. The instructions were written for accounts hosted on the Windows 2000 platform. If your account is hosted on Windows NT 4.0 please contact Technical Support for client configuration set up.
· Your Server Name and Web Site IP address to set up your connection. If you are not sure of your Server Name and IP address, go to the Account Information section of your hosting account Control Panel. For example, http://yourdomainname/stats Click change address
· SQL Server 7.0 Server Enterprise Manager installed. If not, you will need to run SQL Server 7.0 setup from your SQL software and select the Client Connectivity and Management Tools options.
Note: SQL Server Enterprise Manager is a 32-bit application. It
cannot be installed on computers running 16-bit operating systems.
1. On the Start menu point to Programs/Microsoft SQL Server 7.0 and then click Client Network Utility. The SQL Server Client Network Utility screen opens.
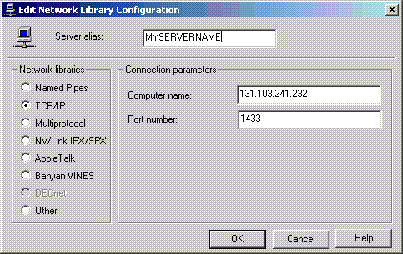
2. Click Add… (for a new server) or Edit… (for an existing server). The Network Library Configuration screen opens.
3. Enter your Server Name in the Server alias text box. (This refers to the server running Microsoft® SQL Server™ that listens on the TCP/IP Sockets network library.)
4. Select the TCP/IP option.
5. Enter your IP address in the Computer Name text box. (This refers to the computer that listens for TCP/IP Sockets clients.)
6. The port number should always be 1433. (This is the default TCP/IP port SQL listens on.) Click OK.
Client Network Utility
Note: You can use the SQL Wizard or setup manually. These instructions use the wizard. If the Register Server Wizard does not start, then someone selected From now on I want to perform this task without using a wizard when the Register Server Wizard was last used. If so, the Registered SQL Server Properties dialog box opens. Most Wizards can be accessed from the Tools menu in this dialog box.
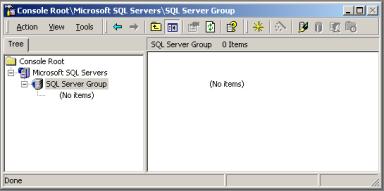
1. On the Start menu point to Programs/Microsoft SQL Server 7.0 and then click Enterprise Manager. The SQL Server Enterprise Manager screen opens.
SQL Enterprise Manager
2. Right click the SQL Server Group. (In the example shown, it is highlighted and located in the left pane below Console Root.)
3. Click New SQL Server Registration…The Register SQL Sever Wizard opens. Click Next.
4. Select the server you defined using the SQL Server Client Network Utility. Click Add and then Next. The Select an Authentication mode part of the wizard opens.
5. Select the SQL Server login… (SQL Server authentication) option. Click Next.
6. Enter your login name and password. Click Next.
7. Select Add the SQL Server(s) to an existing group. Use the default Group name (SQL Server Group). Click Next.
8. Completing the Register SQL Server Wizard screen displays. Click Finish.
9. The status should show the registration was successful.
Microsoftâ SQL ServerÔ is a complex Client/Server database system. Microsoft includes an online SQL Server Book when SQL is installed. This can easily be accessed from Start/Programs/Microsoft SQL Server 7.0/Books Online. You also can find information at www.msdn.microsoft.com/library or of course, through a third party book. Although our technical support staff is very knowledgeable, to better serve the needs of all our customers it is our policy to limit technical support to only the connection process of SQL as it relates to web hosting.
q Is the server name correct?
q Is the IP address correct?
q Is your online connection working?
q Are your userID and your password correct?
q Are you using the correct network library? (i.e. TCP/IP)